 Weld Add ( Drawing Editor > F6 )
Tool summary :
Also see :
- Drawing Editor (where Weld Add is a tool)
- Weld symbols character height ( Fabricator > Detailing > Drawing Presentation > the " Sizes " tab > )
- Show weld length on weld symbols ( Job > Weld Design Settings > set default for auto detailing)
- Weld symbol exact point (placed during Weld Add )
- Weld Edit window (opened with Weld Add )
- Layer Panel (sets drawing layer for adding symbol to)
- Weld Combo (another way to add weld symbols)
Step-by-step instructions :
The following instructions assume that you are using a 3-button mouse, that User and Site Options > General > " Point location target " is set to ' Fancy ' ( ![]() ), and that you use mouse bindings similar to those shown in these illustrations.
), and that you use mouse bindings similar to those shown in these illustrations.

|
1 . Invoke Weld Add . |
|
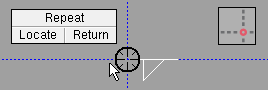
2 . When the target ( |
|
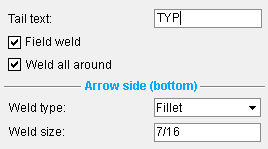
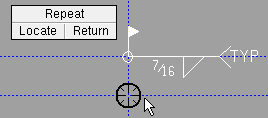
3 . On the Weld Edit window, enter the settings that you want applied to the weld symbol. Press the " OK " button at the bottom of the window to generate the weld symbol. |
|
4 . Left-click ( Locate ) to add a similar weld symbol; middle-click ( Repeat ) to add a duplicate weld symbol; right-click ( Return ) when you are done. |
▸ Click the Weld Add icon. The icon can be taken from the group named ' Objects -- Weld Symbols ' and placed on the ribbon.
▸ Weld Add can also be invoked using a keyboard shortcut , the context menu , or a mode . For the ' Lightning ' layout style, configuration of the interface is done using Customize Interface .
▸ With Weld Mode mouse bindings active, middle-click ( Add ).
Note 2: Middle-click ( Repeat ) can be used at the beginning of this operation (in step 2) as well as in step 4. The preview of the weld symbol shows you the last weld symbol that was added or edited in your current Drawing Editor session. It is the weld symbol that you will get if you middle-click ( Repeat ). See above to set the preview to match an existing weld symbol.

bindings , steps 2, 4 Note 3: Right-click ( Return ) in steps 2 or 4 ends the operation.
bindings , steps 2, 4 Note 4: Any weld symbols added using this procedure can be instantly removed (one at a time, in reverse-order of their addition) by using Undo .

